Installation of the router
This page describes how the individual router models have to be connected to the Enterprise Connect network (WAN) in order to perform the activation subsequently.
Please select the corresponding router model below, which you would like to install:
- AR657W
- AR6280
- AR8140
- Business Box
Installing the AR657W router model
If not specifically noted, the following description of the router installation applies to EC-M, EC-L and EC-XL sites. For EC-XL sites, simply install two routers according to these instructions.
If you need a description to find the ports on the router, you will find it in the router overview.


1. Physical installation
The AR657W router can be operated as desktop equipment or in a 19" rack. The mounting brackets for rack installation are included.
- Install the mounting brackets for rack installation if required.
- Always position the AR657W router horizontal.
The router has a fan. The side ventilation slots must not be covered. Please make sure there is at least 5 cm of free space around the router so that the heat can dissipate.
2. Power connection
- Plug the power supply unit into the socket and into the router (A). The router turns itself on automatically after the power supply unit is connected.
- Secure the power cable with the power cable fastener provided.
- After turning on, a FAST flashing of the green SYS LED (D) is visible on the router. Please wait until it flashes SLOWLY. The router is then ready for operation.
3. WAN connection
The WAN connection is different on the access technology available for the site.
EC-M: FTTH connection
- In case of a FTTH connection, Swisscom has installed an OTO socket.
- Plug in the supplied fiber module into port GE9 (B) and connect the WAN cable to the inserted module and OTO socket.
- The GE9 LED (E) on the front of the router now lights up green or flashes green.
- If the WAN link is using an xgsPON connection, do the xgsPON pairing as described below.
EC-M: Copper connection
- In case of a copper connection, Swisscom has installed a copper socket.
- Connect the VDSL port (C) of the router to the copper socket using the DSL connection cable supplied.
- The VDSL LED (F) on the front of the router lights up green or flashes green approximately 6 minutes after the VDSL line is switched on. This time is needed to establish the VDSL connection.
EC-L/XL: FTTO connection
- Insert the supplied SFP into port GE9 (B).
- For a FTTO fiber optic connection, no fiber optic cable is supplied. The customer is responsible for the house installation and therefore a fiber optic cable must already be available at the router location.
- Plug in the fiber optic cable into port GE9 (B) of the router.
- The GE9 LED (E) on the front of the router now lights up green or flashes green.
Mobile Access
- In case of Mobile access, please carry out the installation steps for Mobile Access.
Installing the AR6280 router model
Unless specifically indicated, the following description applies to the router installation for EC-L and EC-XL sites. Both routers must be installed according to these instructions in the case of EC-XL sites.
If you need a description to find the ports on the router, you will find it in the router overview.
1. Physical installation
The AR6280 router can be operated as a desktop device or in a 19" rack.
- Install the router in a 19" rack if required.
- Always position the AR6280 router horizontal.
The router has a fan. The lateral ventilation slits should not be covered. Please make sure there is at least 5 cm of free space around the router so that the heat can dissipate.
2. Power connection
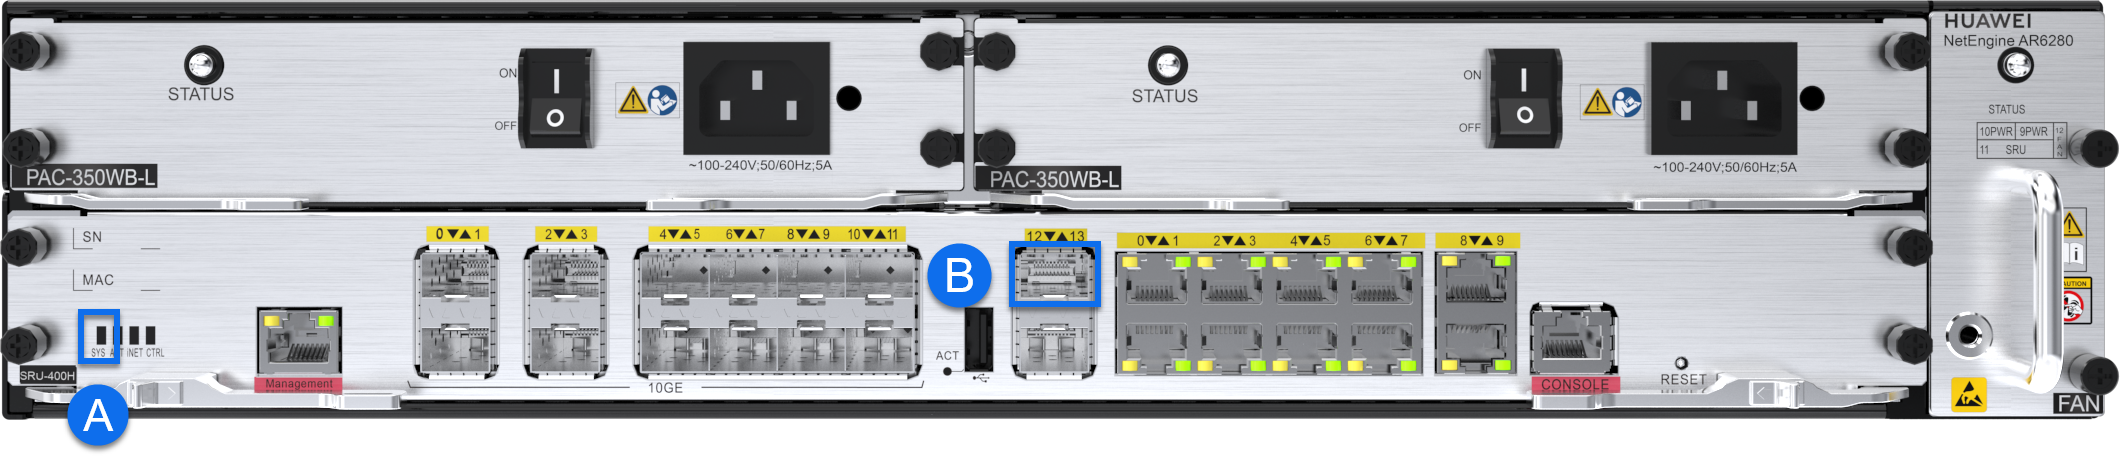
- Connect the two power supplies built into the router with the two power cables included in delivery with the 220V sockets.
- Turn on the router by pressing the on/off switch on the two built-in power supplies. The LED status of the two power supplies must light up in green.
- After being turned on, FAST flashing of the green SYS LED (A) on the router is visible. Please wait until it flashes SLOWLY. After this, the router is operational.
3. WAN connection
- Insert the supplied SFP into 10G port 13 (B).
- For a FTTO fiber optic connection, no fiber optic cable is supplied. The customer is responsible for the house installation and therefore a fiber optic cable must already be available at the router location.
- Connect the optical fibre cable for the WAN connection (not included in the scope of delivery) to the router on the Ethernet port 10G port 13 (B).
- The right triangular LED of 10G port 13 must light up green.
Installing the AR8140 router model
The AR8140 router can be operated as a desktop device or in a 19" rack.
Unless specifically indicated, the following description applies to the router installation for EC-M, EC-L and EC-XL sites. Both routers must be installed according to these instructions in the case of EC-XL sites.
If you need a description to find the ports on the router, you will find it in the router overview.

1. Physical installation
The AR8140 router can be operated as a desktop device or in a 19" rack.
- Install the router in a 19" rack if required.
- Always position the AR8140 router horizontal.
The router has a fan. The lateral ventilation slits should not be covered. Please make sure there is at least 5 cm of free space around the router so that the heat can dissipate.
2. Power connection
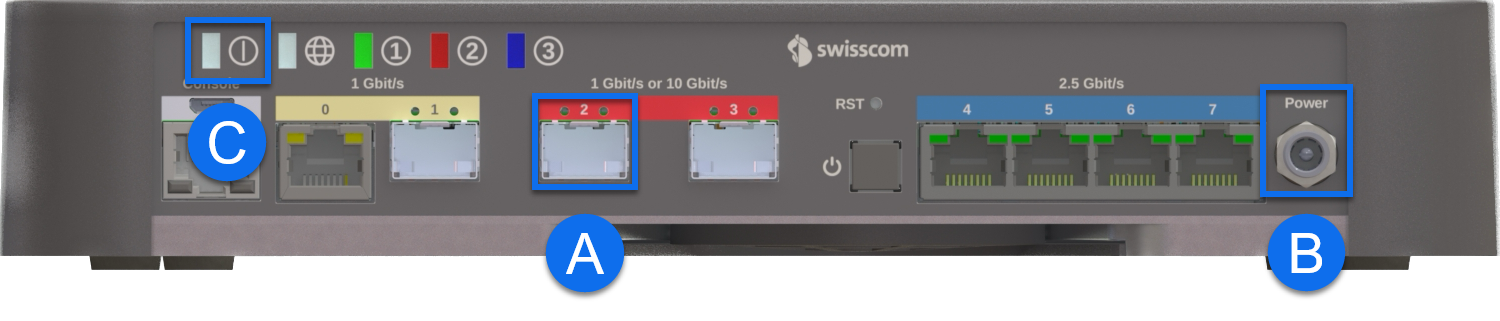
- Connect the two power supplies built into the router with the two power cables included in delivery with the 220V sockets.
- After connecting the power supplies, the green SYS LED (A) on the router are flashing. Please wait until it lights up continuously. The router is then ready for use.
3. WAN connection
The WAN connection is different on the access technology available for the site.
EC-M: FTTH connection
- In case of a FTTH connection, Swisscom has installed an OTO socket.
- Plug in the supplied fiber module into port 10GE9 (B) and connect the WAN cable to the inserted module and OTO socket.
- The 10GE9 LED on the front of the router now lights up green or flashes green.
- If the WAN link is using an xgsPON connection, do the xgsPON pairing as described below.
EC-L/XL: FTTO connection
- Insert the supplied SFP into port 10GE9 (B) (1Gbps or 10Gbps SFP).
- For a FTTO fiber optic connection, no fiber optic cable is supplied. The customer is responsible for the house installation and therefore a fiber optic cable must already be available at the router location.
- Plug in the fiber optic cable into port 10GE9 (B) of the router.
- The GE9 LED on the front of the router now lights up green or flashes green.
Installing the Business Box
If not specifically noted, the following description of the router installation applies to EC-M, EC-L and EC-XL sites. For EC-XL sites, simply install two routers according to these instructions.
If you need a description to find the ports on the router, you will find it in the router overview.
1. Physical installation
The Business Box can be operated as desktop equipment or in a 19" rack. The mounting brackets for rack installation are included.
- Stick the rubber feet to the Business Box if required.
- Always position the Business Box horizontal.
The router has a fan. The side ventilation slots must not be covered. Please make sure there is at least 5 cm of free space around the router so that the heat can dissipate.
2. WAN connection
The WAN connection is different on the access technology available for the site.
EC-M: FTTH connection
- In case of a FTTH connection, Swisscom has installed an OTO socket.
- Plug in the supplied fiber module into port GE2 (A) and connect the WAN cable to the inserted module and OTO socket.
- If the WAN link is using an xgsPON connection, do the xgsPON pairing as described below.
EC-M: Copper connection
- In case of a copper connection, Swisscom has installed a copper socket.
- Plug in the supplied copper module into port GE2 (A) and connect the WAN cable to the inserted module and copper socket.
- After powering on the router, wait for approximately 6 minutes after the VDSL line is switched on. This time is needed to establish the VDSL connection.
EC-L/XL: FTTO connection
- Insert the supplied SFP into port port GE2 (A).
- For a FTTO fiber optic connection, no fiber optic cable is supplied. The customer is responsible for the house installation and therefore a fiber optic cable must already be available at the router location.
- Plug in the fiber optic cable into port GE2 of the router.
Mobile Access
- In case of Mobile access, please carry out the installation steps for Mobile Access.
3. Power on
After the installation of the WAN connection, the Business Box can be powered on.
- Attach the power adapter to the power plug (B)
- After turing on, the system LED (C) flashes orange. When the system LED flashes red you may proceed with the router activation.
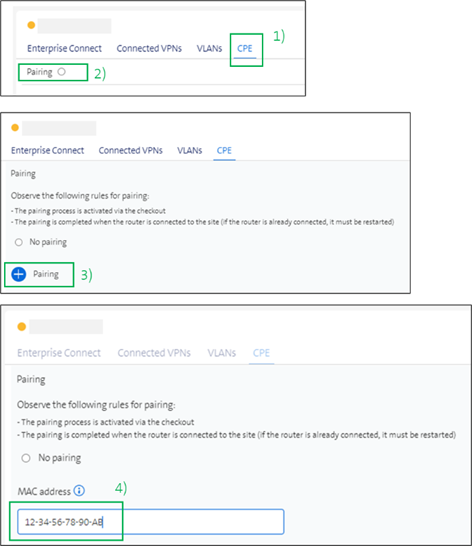
xgsPON pairing
In case of an EC-M FTTH connection with xgsPON, the following steps for pairing have to be performed.
Do the xgsPON pairing on the EC dashboard as follows:
- Open the pairing at CPE on the corresponding site (steps 1 to 3)
- Enter the MAC address specified on the router (step 4)
- Confirm your entry and submit
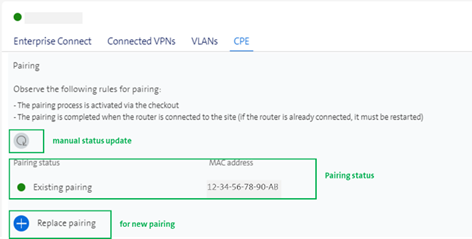
- After the pairing, wait 2 minutes to activate the router with ZTP. Note: The LED from port 9 on the front of the router will only light up after the ZTP process has been completed.
- The status of the pairing is displayed in the dashbar. The status display must be updated manually.