Access Points
Set up an access point
- How to get into the ordering process: Order Management
- You can connect access points directly to a switch or directly to Centro Business (Router).
- The connected Access Points are displayed in the Dashboard under locations > Access Points.
- For access points, you also have a utilisation graphic like the one for the LAN switches.
- Click on the desired location
- Click on Access Points
- Save the configuration
- Activate the configuration by submitting the shopping cart
Access Point Ports
- If you configure ports on the access point, this configuration is also applied for other access points on the same connection.
- This also applies for other access point types.
- Uplink Port to Switch
- Looped Port (PT to E0/PT)
- Looped port (E0/PT to PT)
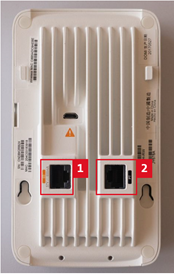
- Configurable ports (E1 corresponds to Port 1 in Dashboard, E2 corresponds to Port 2 in Dashboard)
- Configurable port with PoE (E3 corresponds to Port 3 in Dashboard)
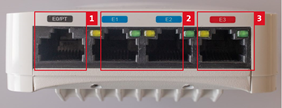
- Configurable ports without PoE (1 corresponds to Port E1, 2 corresponds to Port E2)
- Configurable port with PoE (corresponds to port E3 on access point)

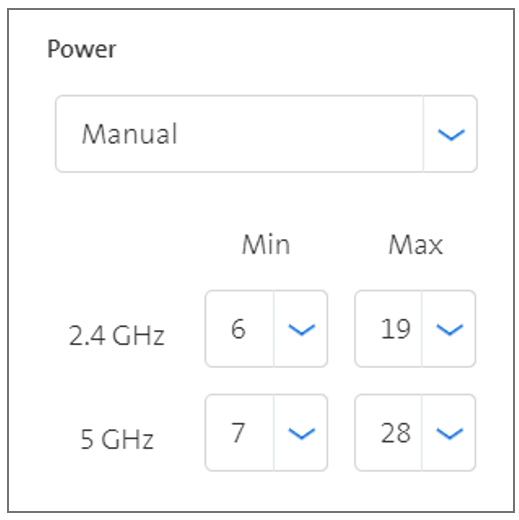
Access Point trasmission power
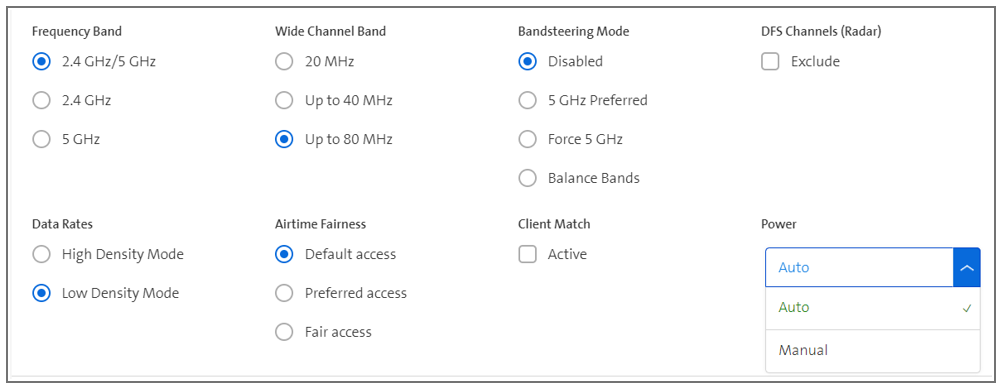
- In Access Point Groups, the Min/Max Power on the 2.4GHz and/or 5GHz WiFi can be selected.
- By default, Auto is set.
- In certain cases, better WiFi performance can be achieved with manual values.
Access point help
If you want to move an access point to another location, note the following sequence:
- Disconnect access point
- Delete access point at old location in the Dashboard (only possible 5 to 15 minutes after the access point has been disconnected)
- Reset access point to factory settings
- Start up access point at new location
- If you want to connect access points directly to Centro Business or a switch without PoE, you must ensure a power supply for the access points (the delivery does not contain a power pack).
- Do not configure managed access points with the same SSID as unmanaged access points (including Centro Business WIFI).
- Do not position access points too close to Centro Business if Centro Business wifi is enabled. This can lead to wifi interference.
- Access points must be connected to a port configured as Trunk with untagged VLAN corp 1.
Setting up LAN switches (pairing/ help/resetting switch)
- If you order access points via channels other than Swisscom, the onboarding process will not work. You can use them normally as access points in the network, but you cannot configure them via the Dashboard.
- Do not paint access points (e.g. to give them the same colour as the ceiling) as this will reduce the wifi quality.
- A maximum of 128 access points can be connected to a switch (manufacturer specification).
- General help and frequently asked questions about Access Points and Switches can be found here: FAQ
Resetting access point to the factory settings
207 Access Point
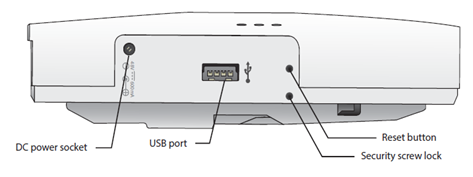
Proceed as follows to reset a 207 access point to the factory settings:
- Remove the Ethernet cable from the access point.
- Press the Reset button with a paper clip and keep it pressed.
- Reconnect the Ethernet cable.
- Wait 10 seconds until the LED flashes quickly.
- Release the Reset button. The device is then reset to the factory settings.
228 Access Point
Proceed as follows to reset a 228 access point to the factory settings:
- Remove the Ethernet cable from the access point.
- The transparent plastic cover on the LED must be removed with an Allen key (8mm).
- The Reset button is located to the right of the LED. Use a paper clip to press it and keep it pressed.
- Reconnect the Ethernet cable.
- The LED starts to flash, flashes more slowly and after a few seconds flashes quickly again. As soon as this happens, release the Reset button.
- The device is reset to the factory settings.

Aruba Access Point 303H Hospitality
Proceed as follows to reset an Aruba access point 303H Hospitality to the factory settings:
- Disconnect the access point from the power supply.
- Use a paper clip to press the Reset button and keep it pressed.
- Reconnect the power without releasing the button. The LED then flashes within 5-15 seconds.
- When the LED starts to flash quickly, release the Reset button.
- The system status LED flashes again within 15 seconds and indicates that the reset is complete. The access point will now start with the factory settings.